Starting next semester, I’ll be working on computer vision research through Cooper Union’s Autonomy Lab, developing an open source and inexpensive alternative to complex motion capture systems using Microsoft’s Kinect camera platform. It’s a super cool project, and I’ll be furthering initial work by a group of students this past semester. Some applications of body-tracking with the Kinect camera include evaluation of exoskeletons (one of Dr Shah’s research areas), gait analysis for healthcare, and animation.
Additionally, since beginning work at NVIDIA on the Jetson Nano team, I’ve set up Linux for Tegra and used it for a few sample projects on the Nano. It is my expert opinion that the L4T background is much, much cooler than the default Debian wallpaper.
The more projects I do, the more I’ve learned that experience comes from making and fixing your mistakes, not reading textbooks or taking courses. I didn’t really set out to learn Linux, but I needed to figure it out quickly.
To get started, I needed to test the system, which meant I’d need to set it up on Linux. I’ll write about the actual system later; this post contains a lot of my mistakes: installing and uninstalling Linux partitions on my Windows laptop, configuring cameras, and debugging WiFi drivers on Ubuntu. Okay, let’s begin.
Installing Debian
I knew I needed a Linux distribution, and my roommate happened to have a bootable drive with Debian 9 on it, so I decided to use that. Debian is known as the “granddaddy” of Linux systems. Ubuntu, the most common distribution, shares much of its architecture because it’s built on Debian. As such, I figured many of the same packages would work (this was incorrect, as we will later see).
A bootable drive is a hardware device (like a USB drive, a CD-ROM, or even a floppy disk, if people even use those anymore) that has the files your computer needs to boot up. When the computer boots, it uses firmware called BIOS that sets the initial conditions and manages the startup. You can change your BIOS settings in Windows by either going to the BIOS menu, or by pressing F2 repeatedly during startup.
When installing a new operating system, booting from a drive installs or repairs the new OS. This was pretty easy — turn on USB boot in BIOS settings, choose “advanced boot,” and select “boot from EFI USB drive”. When the computer reboots, let it do its thing, and follow the instructions to install Debian, choosing a keyboard layout, language, and username/password combination.
A new OS won’t contain any of the packages you need (I had to install su and sudo, the superuser/admin privileges, without them - funny story). The first time I used sudo, Debian showed me the following cute message:
We trust you have received the usual lecture from the local System
Administrator. It usually boils down to these three things:

    #1) Respect the privacy of others.
    #2) Think before you type.
    #3) With great power comes great responsibility.

root's password:
Of course, I am the super user, so when Debian asked me about having talked to the sysadmin, my reaction boiled down to:

In order to install Microsoft Kinect’s Software Developer Kit, the developer (me!) needs to configure keys from Microsoft’s server. My teammate, Andy, from the lab sent me a script he used to configure the keys, download all the packages he had used, and run the camera visualizer at the end. It was a great idea, but it ran with very many errors. I tried running the script line by line, and even then it didn’t work. I couldn’t even open the camera visualizer to get a livestream feed, which should be possible even without any of Andy’s software, but it kept throwing errors. It was at this point, reading the download documentation, that I realized I may have made a mistake:
Currently, the only supported distribution is Ubuntu 18.04. To request support for other distributions, see this page.
Of course, support for Debian 9 has been planned for a year and a half but not implemented yet 🙃. My attempts to configure the keys necessary to unlock the Azure Kinect SDK repository kept failing, and my efforts were in vain, because there was literally no way for them to work. Even the camera wouldn’t be recognized by the OS.
Lesson learned: always double check the system requirements for your software. At this point, I could not use any of the software or the operating system I had installed to run the computer vision program I wanted to. Back to the drawing board!
Windows Subsystem for Linux
The above download link also specifies that you can download the files for Windows, with none of this command line buffoonery, so I decided to try that. I’m a huge fan of Windows Subsystem for Linux, which is a Linux interface to your Windows system, so you can use the command line to manage your files. This has been super helpful with using git in particular (I refuse to use GitHub Desktop), and is far superior to Linux emulators like Cygwin because WSL can access your system files. My one gripe is that I keep forgetting my sudo password and having to reset it, but that seems like a me problem, not a Microsoft problem.
This time, it turns out, it was the body-tracking software that Andy had used that didn’t play nice with Windows. Even though I ran his script line by line again, I think there was a mismatch in the keys for the SDK repository, and the Microsoft software wasn’t running correctly. Once I had configured the keys, the software kept expecting a Linux OS, which, of course, I didn’t have, being on Windows. Again, hammering home the point that using the specified, tried-and-true OS is really a great way to get things the first time, instead of being stubborn like me and using literally anything else.
That being said, I did manage to get the camera working and familiarize myself with the Azure Kinect viewer though! I confirmed that all the aspects of the camera were working - it has a colour camera, a depth camera, and an infrared camera, as well as an accelerometer, gyroscope, and microphone. If you can’t get the whole thing working in one go, it is often more manageable to split your task into smaller tasks, and accomplish them all, then put it together at the end.
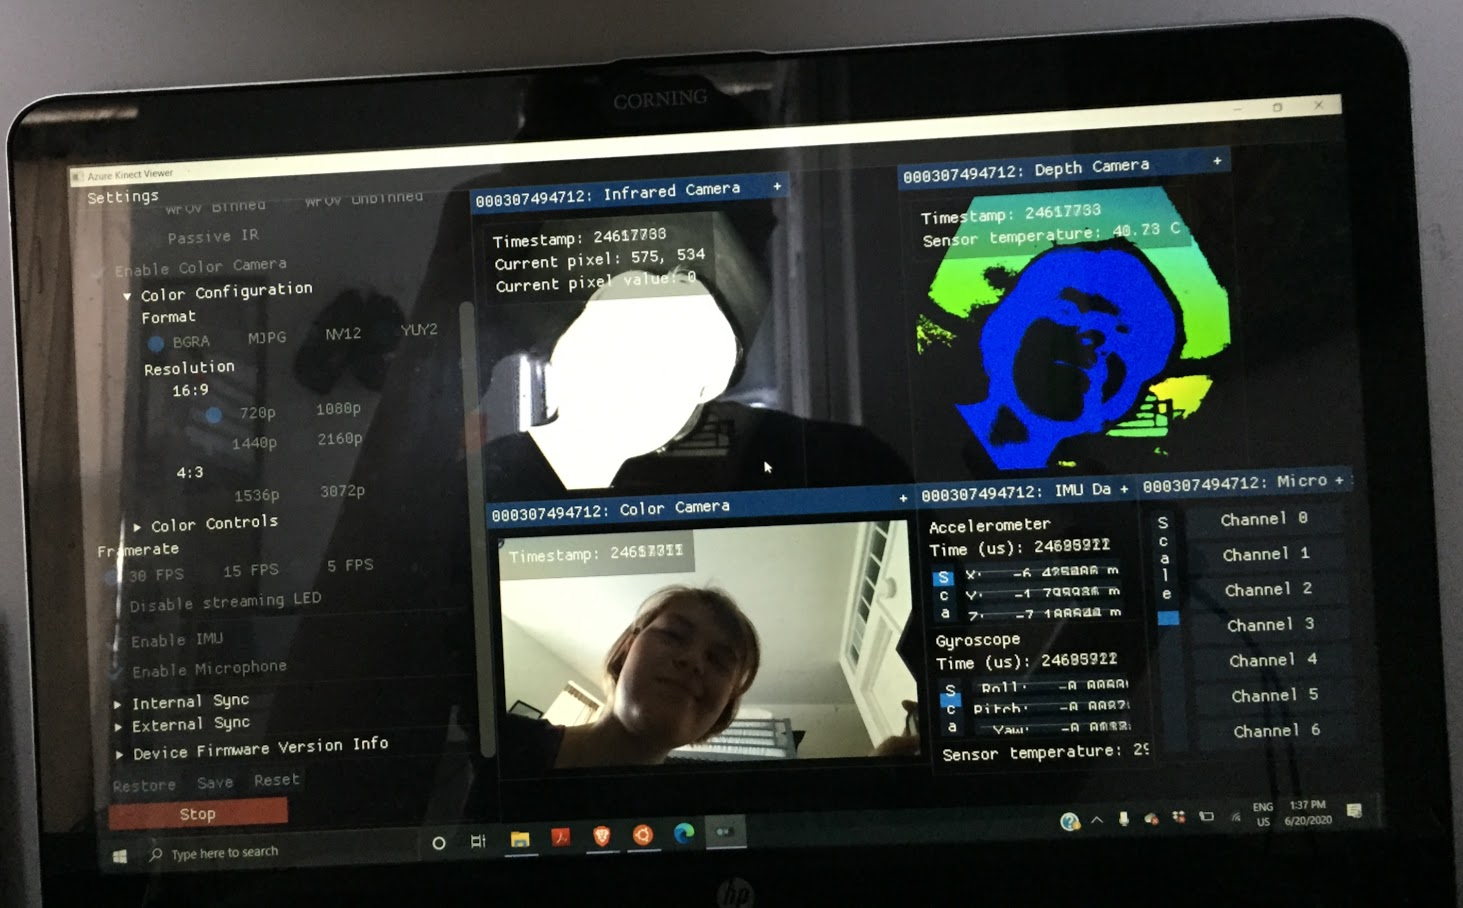
POV: you are the Azure Kinect camera developer kit and I am the developer looking at you and pleased you are working as intended
Alas, I needed to get this system working, so I relegated myself to the installing the thing that already worked: Ubuntu 18.04. (which is actually a pretty great OS - no shade).
Debian Disappearance
Remember how I had dual-booted with Debian at this point? Yeah? Debian does this cute thing where if you do not rush to select the Windows Boot Manager within five seconds of pressing the power button, it automatically boots to Debian, an OS that I have literally used twice. One day, my computer booted directly to Windows without even asking me if I wanted Debian! Weird, because I hadn’t changed any settings.

Me noticing that Debian was, in fact, not booting automatically
After a little e-searching, I figured out that somehow Debian had been removed from the GRUB settings. GRUB is a bootloader, which is an important part of how your computer starts up:
When a computer is turned off, its software—including operating systems, application code, and data—remains stored on non-volatile memory. When the computer is powered on, it typically does not have an operating system or its loader in random-access memory (RAM). The computer first executes a relatively small program stored in read-only memory (ROM) along with a small amount of needed data, to access the nonvolatile device or devices from which the operating system programs and data can be loaded into RAM. (from Wikipedia)
(I also figured out this is why we call them “strapping” options for GPUs - the more you know!)
The Debian files are still somewhere on the OS, they’re just not showing up— you have to add them to the GRUB path, which can be done with this one line command in the Windows Command Prompt:
bcdedit /set {bootmgr} path \EFI\debian\grubx64.efi
Restart, and I had the option to boot into Debian. Note that I didn’t want to, but I figured it was something I should have if I wanted to remove it 😱.
“99% of computers is just googling stuff and following instructions and praying it doesn’t mess up your computer.” Luckily for me, my laptop was safe this time, and my files live to see another day.
Uninstall Debian, Install Ubuntu
Installing is the easy part, because the installer on the bootable drive does all the work for you (but, thankfully, it does not count as cheating). When you remove the partition, it’s important that you remove the correct one - or else you could end up deleting your entire filesystem. In Windows, this happens in your “Disk Management” settings. As a general rule, Windows drives are denoted by a letter (below, C: or D:), and are a “NTFS” file system, which is proprietary to Microsoft. Your Windows OS can’t recognize other OS’s filesystems, so it leaves them blank. So I went ahead and deleted all the non-NTFS disks, and reallocated that space to the main Windows drive.
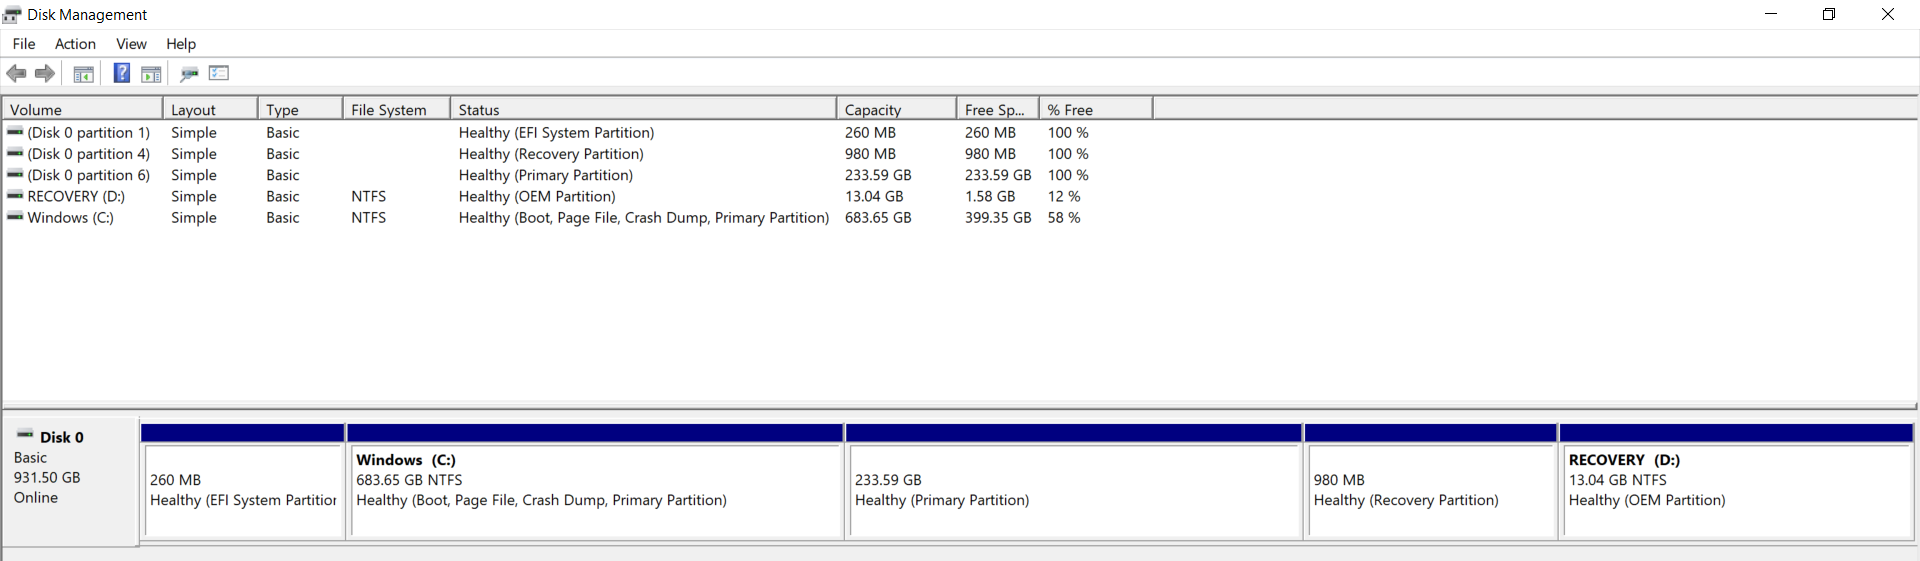
What it looks like now, with Ubuntu and Windows dual-booted
I rebooted my computer, and y’all…. I do not think I can adequately express how terrified I was when the screen came up completely black except for the text “GRUB rescue”. I thought I had lost literally everything on my computer, with no backup. I am so glad that wasn’t the case, but word to the wise: don’t mess around with your computer firmware unless you have a backup.
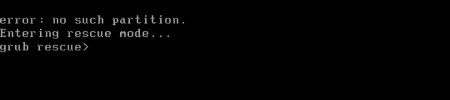
Worse than the blue screen of death!
I was very confused - where was I, and what did my computer do with its bootloader? It turns out, if you really mess up your boot sequence, you get stuck in GRUB rescue, and that’s exactly what I did. GRUB is the bootloader that manages Linux distributions and allows you to choose which operating system to boot into — it initializes the kernel, which interfaces between hardware and software, and is responsible for the “choose your OS” screen you first see during startup. In the simplest terms, because I had deleted Debian and its associated boot, my computer didn’t know how to turn on, and I needed to repair Windows.
Because GRUB rescue is only for emergencies, it’s super basic — there’s no autofill by tabbing (a favourite feature of mine when using the command line), and you need to be ultra careful what you type, because a wrong command could corrupt your system. Wikihow was actually super helpful when it came to figuring this out. The boot files are listed in a folder of the partitions, so all you have to do is add them to the path, and then tell the computer to install and boot the “normal” way. Pretty simple, right?
I will admit, initially I just thought I’d figure out how to use the GRUB rescue and call it a day, but when it became clear I would have to input these commands every time I wanted to turn my computer on, I decided to just cut my losses and fix Windows. I feel like I learned things, though, and I’m a lot more confident dealing with operating systems now.
Intermission: A Trip to Target
At this point, it was clear that the only OS that was going to work was Ubuntu 18.04, Bionic Beaver, since that was the only one supported by the Microsoft Kinect SDK. So I needed to remove Debian, install Ubuntu, and hopefully not mess up my filesystem. In order to back up my files and Windows OS so I could restore them in the event things went terribly wrong, I bought two USB flash drives at Target: one to create a bootable Ubuntu drive, and another to create a bootable Windows drive.
It’s pretty easy to create a bootable drive from Windows. Once I had passed the GRUB rescue screen, Windows can make a recovery drive. Same thing as before, then, insert the drive, select “boot from drive,” and your OS will repair itself. Very easy! After doing this, I created a bootable Ubuntu drive according to the guide on their website and installed it.
WiFi Worries
With Ubuntu 18.04, and all the necessary software packages installed, I was living the dream! Everything should work for the camera, right? Not so fast. OpenCV decided to not be installed, whether on the command line or the GUI. At this point, it’s worth pointing out that I do have a research laptop that Autonomy Lab gave me that already contains everything I need, and has working, compiled code on it, so I simply used that (although I also dual-booted my computer. Someone please help I have three laptops now).
That laptop has a catch: its WiFi was not enabled, and no one could figure out how to fix it. The laptop clearly had wireless capabilities (which laptops don’t, nowadays?) . Now I have to worry about operating systems AND networking?
The truth is, I wish I could tell you why it wasn’t working. I tried literally every StackOverflow thread. I installed new WiFi drivers. Booting to Windows and debugging the WiFi there (spoiler alert: more OS malarkey ensued, since someone had removed the Windows partition). The Intel WiFi card in the laptop had a known incompatibility with Ubuntu 18.04, but it appears (from a very long Ubuntu support thread) that the issue has been resolved. Some people said the only thing that fixed their issue was taking out the battery, letting the computer’s power dissipate, and then restarting it. I did not have tiny enough screwdrivers to do this, so I didn’t try it.
Eventually, the WiFi was noted as “hardblocked” according to rfkill, a tool to enable and disable wireless devices on Linux. Bluetooth did not have the same issue, being neither hard nor soft blocked. It turns out that something being hardblocked means it is limited by the computer’s hardware, not the software. In other words, the commands I was running in the terminal simply weren’t going to work, not for lack of trying, but because I had flipped a switch somewhere. A hardware WiFi switch can either be a toggle switch on the side or front of the laptop, or a combination of function keys. I couldn’t find a toggle switch and didn’t know which function keys were the WiFi switch, but there was a really dumb fix. Remember BIOS settings you get after pressing F2 for forever during startup? Yeah? Well, there is a setting that allows your WiFi to be controlled by the hardware. If you uncheck that box in the BIOS, the WiFi is free to escape from the computer (not actually how it works). Without being hard blocked, the WiFi is actually enabled! So that worked!
I hope to write another post detailing the implementation of the system soon. Starting this research over the summer as opposed to beginning in the fall allows me to ensure continuity of the project and communicate with the now-graduated original research assistants, who are off to grad school and will have their own challenging projects to work on. When we begin again in the fall, I’ll be able to onboard my peers. My priority currently is familiarizing myself with the codebase, understanding the math (linear algebra) behind the joint estimations, and identifying key research priorities for the year to come.
Comments